使用 Travis CI 优雅地将你的静态网站部署到阿里云 OSS 上

背景介绍

之前 Blog 是放在 Github Page 上托管的,大致步骤如下:

  1. 在 Github 上提交博客原始文件在 source 分支上;
  2. Travis-ci 设置为 Node 环境,并使用 Hexo 将 source 分支下的文件生成静态网页,再强制提交到 master 分支;
  3. 由于 Github Page 绑定域名不支持 HTTPS, 又使用了 Cloudflare 作为 CDN 全站加速,并强制 HTTPS 访问。

这种方式 0 成本部署网站的方式,不仅免备案,还满足了我全站 HTTPS 的执念,让我很满意。唯一美中不足的就是国内访问速度太慢。为了改善访问速度,我又尝试了将全站加速切换到阿里云的海外版全站加速服务,但是效果还行不行,国内访问时快时慢,很不稳定。就在研究阿里云的过程中,发现阿里云 OSS 支持部署静态网站,而且香港区域速度很快、很稳定,绑定域名免备案,于是就有了接下来的折腾。

在正式阅读本文章前,你需要了解 Hexo、Travis-ci 是什么,有啥功能;阿里云 OSS、函数式计算、网关服务如何开通、如何使用。否则可能读起来会有些云里雾里的感觉。

文章中的一些配置都是摘录的,可能不完整,你可以参考我的博客配置 https://github.com/liuhu/liuhu.github.io

将 Blog 迁移至阿里 OSS

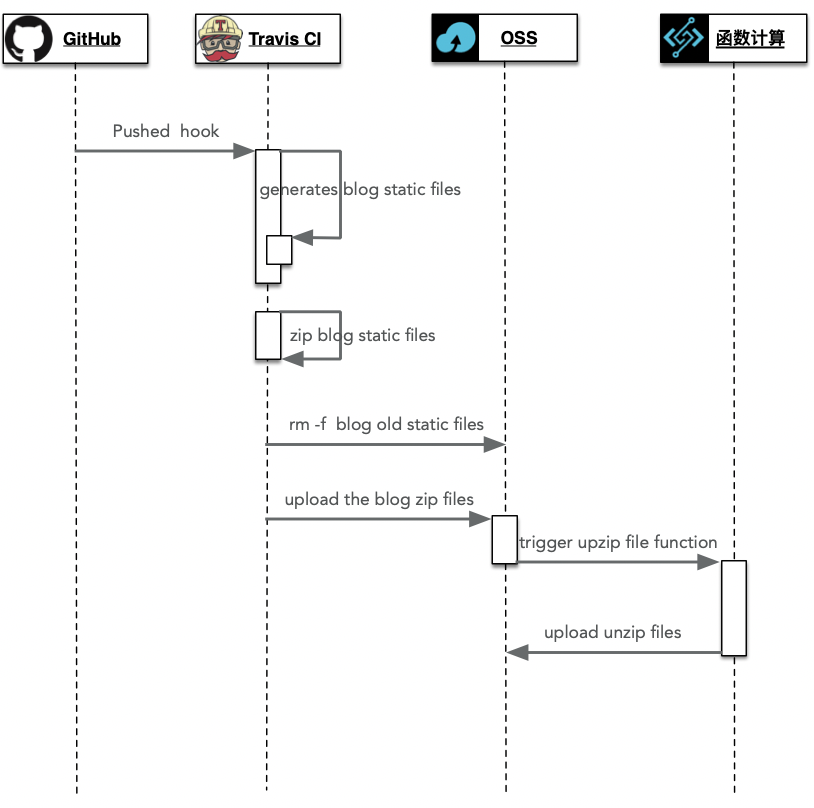
流程介绍

先整体介绍一下部署流程, 如下图:
定制修改 Hexo 支持静态部署

由于 OSS 的资源 必须以绝对路径的方式进行访问。但是 Hexo 生成的静态页面中,部分页面的超链接路径去缺少了具体文件名,会导致访问出现 404 错误。比如默认访问 About me 的地址为 https://www.liuhu.me/about/ 现在需要改为 https://www.liuhu.me/about/index.html。即要将所有生成的静态页面中的超链接路径后加上 index.html 才能正常访问。有如下几点需要修改:

  1. 将文章标题修改为 .html 为结尾的形式。修改根路径下的 _config.yml 文件:

    1
    2
    3
    permalink: :title.html
    # 或者如下方式
    # permalink: :year/:month/:day/:title/index.html
  2. 将导航栏中,标签超链接结尾添加 index.html 。修改 themes/next/_config.yml

    1
    2
    3
    4
    5
    menu:
    about: /about/index.html || user
    tags: /tags/index.html || tags
    categories: /categories/index.html || th
    archives: /archives/index.html || archive
  3. 将文章中标签的超链接结尾增加 index.html 。修改 themes/next/layout/_macro/post.swig :

    1
    2
    3
    4
    5
    6
     <!-- 修改第128行-->
    #}<a href="{{ url_for(cat.path) }}index.html" itemprop="url" rel="index">{#

    <!-- 修改第366行-->
    <a href="{{ url_for(tag.path) }}index.html" rel="tag"># {{ tag.name }}</a>

  4. 将标签云的超链接结尾增加 index.html 。修改 Hexo 插件源码 /node_modules/hexo/lib/plugins/helper/list_tags.js

    1
    2
    // 修改第18行
    const suffix = options.suffix || 'index.html';
  5. 将文章分类的超链接结尾增加 index.html 。修改 Hexo 插件源码 /node_modules/hexo/lib/plugins/helper/list_categories.js

    1
    2
    // 修改第21行
    const suffix = options.suffix || 'index.html';
  6. 将分页超链接结尾增加 index.html 。修改 Hexo 插件源码 /node_modules/hexo/lib/plugins/helper/paginator.js

    1
    2
    3
    4
    // 修改第24行
    function link(i) {
    return self.url_for(i === 1 ? base : base + format.replace('%d', i)) + 'index.html';
    }

配置 Travis CI 持续集成、持续部署

Travis CI 的部署配置如下,你可以参考我的配置

1
2
3
4
5
6
7
8
9
10
11
12
13
14
15
16
17
18
19
20
21
22
23
24
25
26
27
28
29
30
31
32
33
34
35
36
37
38
39
40
41
42
43
44
45
46
47
48
49
50
51
language: node_js
node_js:
- '10.16.0'

# 创建cache目录 ,防止每次编译打包都下载
cache:
directories:
- node_modules
- tools

before_install:
- npm install
- git config --global push.default matching
- git config --global user.name "liuhu"
- git config --global user.email "[email protected]"
- cd ./tools
## 下载阿里云 OSS Linux 客户端
- wget -nc https://liuhu-img.oss-cn-hongkong.aliyuncs.com/common/deploy/ossutil64
- chmod 755 ossutil64
## 配置 OSS 客户端, 包括 OSS 地址,accessKeyID accessKeySecret,使用方式可以参考 https://www.alibabacloud.com/help/zh/doc-detail/50452.htm
- ./ossutil64 config -e "${OSS_ENDPOINT}" -i "${OSS_AKI}" -k "${OSS_AKS}"
## 替换 Hexo 插件,使其支持静态部署
- cd ../node_modules/hexo/lib/plugins/helper
- wget -N https://liuhu-img.oss-cn-hongkong.aliyuncs.com/common/deploy/list_categories.js
- wget -N https://liuhu-img.oss-cn-hongkong.aliyuncs.com/common/deploy/list_tags.js
- wget -N https://liuhu-img.oss-cn-hongkong.aliyuncs.com/common/deploy/paginator.js
- wget -N https://liuhu-img.oss-cn-hongkong.aliyuncs.com/common/deploy/tagcloud.js
- cd -
- cd ..

script:
- hexo clean
- hexo generate

after_success:
- cd ./public
- git init
- git add --all .
- git commit -m "Travis CI Auto Builder"
- git push --force --quiet "https://${GITHUB_TOKEN}@${GH_REF}" master

## 打包静态文件
- zip -r blog.zip ./*
## 删除OSS上旧文件
- ../tools/ossutil64 rm oss://liuhu-blog/ -r -f
## 上传zip文件
- ../tools/ossutil64 cp -f blog.zip oss://liuhu-blog/

env:
global:
- GH_REF: github.com/liuhu/liuhu.github.io.git

使用阿里云函数式计算解压

先通过阿里OSS中的函数式计算创建 ZIP包解压 函数式计算,简化触发器配置和权限授权的配置。然后在 编辑 默认的函数代码,实现在根目录的解压文件。

和默认代码的区别就在于注释的那几个行。

1
2
3
4
5
6
7
8
9
10
11
12
13
14
15
16
17
18
19
20
21
22
23
24
25
26
27
28
29
30
31
32
33
34
35
36
37
38
39
40
41
42
43
44
45
46
47
48
49
50
51
52
53
54
55
56
57
58
59
60
61
62
63
import helper
import oss2, json
import os
import logging
import chardet

logging.getLogger("oss2.api").setLevel(logging.ERROR)
logging.getLogger("oss2.auth").setLevel(logging.ERROR)

LOGGER = logging.getLogger()

def handler(event, context):
evt_lst = json.loads(event)
creds = context.credentials
auth=oss2.StsAuth(
creds.access_key_id,
creds.access_key_secret,
creds.security_token)

evt = evt_lst['events'][0]
bucket_name = evt['oss']['bucket']['name']
endpoint = 'oss-' + evt['region'] + '-internal.aliyuncs.com'
bucket = oss2.Bucket(auth, endpoint, bucket_name)
object_name = evt['oss']['object']['key']

file_type = os.path.splitext(object_name)[1]

if file_type != ".zip":
raise RuntimeError('{} filetype is not zip'.format(object_name))

LOGGER.info("start to decompress zip file = {}".format(object_name))

lst = object_name.split("/")
zip_name = lst[-1]
## 删除 newKey 相关的代码,为了让压缩包在根目录解压

# PROCESSED_DIR = os.environ.get("PROCESSED_DIR", "")
# if PROCESSED_DIR and PROCESSED_DIR[-1] != "/":
# PROCESSED_DIR += "/"
# newKey = PROCESSED_DIR + zip_name
zip_fp = helper.OssStreamFileLikeObject(bucket, object_name)

# newKey = newKey.replace(".zip", "/")

with helper.zipfile_support_oss.ZipFile(zip_fp) as zip_file:
for name in zip_file.namelist():
with zip_file.open(name) as file_obj:
try:
name = name.encode(encoding='cp437')
except:
name = name.encode(encoding='utf-8')

detect = chardet.detect( (name*100)[0:100] )
confidence = detect["confidence"]
if confidence > 0.8:
try:
name = name.decode(encoding=detect["encoding"])
except:
name = name.decode(encoding='gb2312')
else:
name = name.decode(encoding="gb2312")
## 删除 newKey
bucket.put_object(name, file_obj)

使用阿里云网关配置根域名301跳转

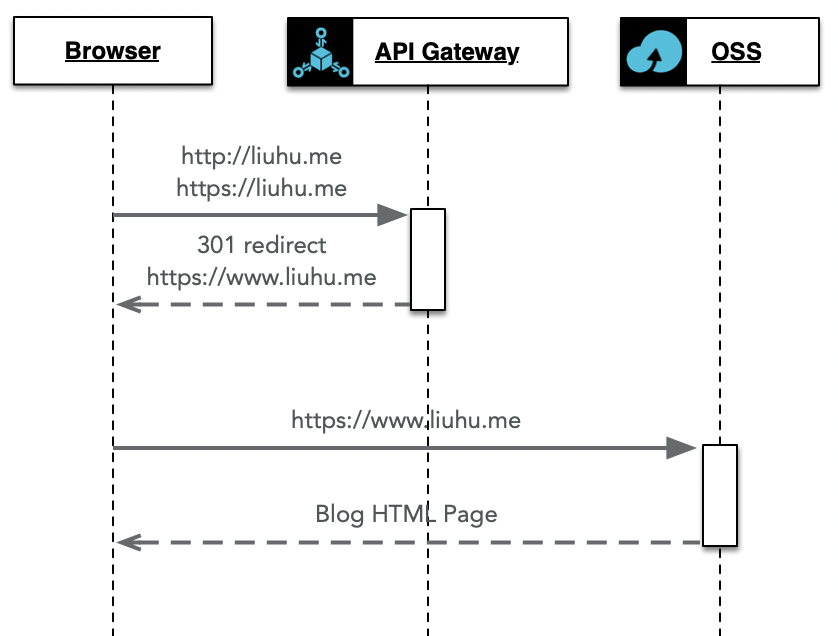
创建阿里云API网关,并绑定根域名地址。DNS解析中增加根域名CNAME解析记录,指向到API网关地址。
访问流程如下:
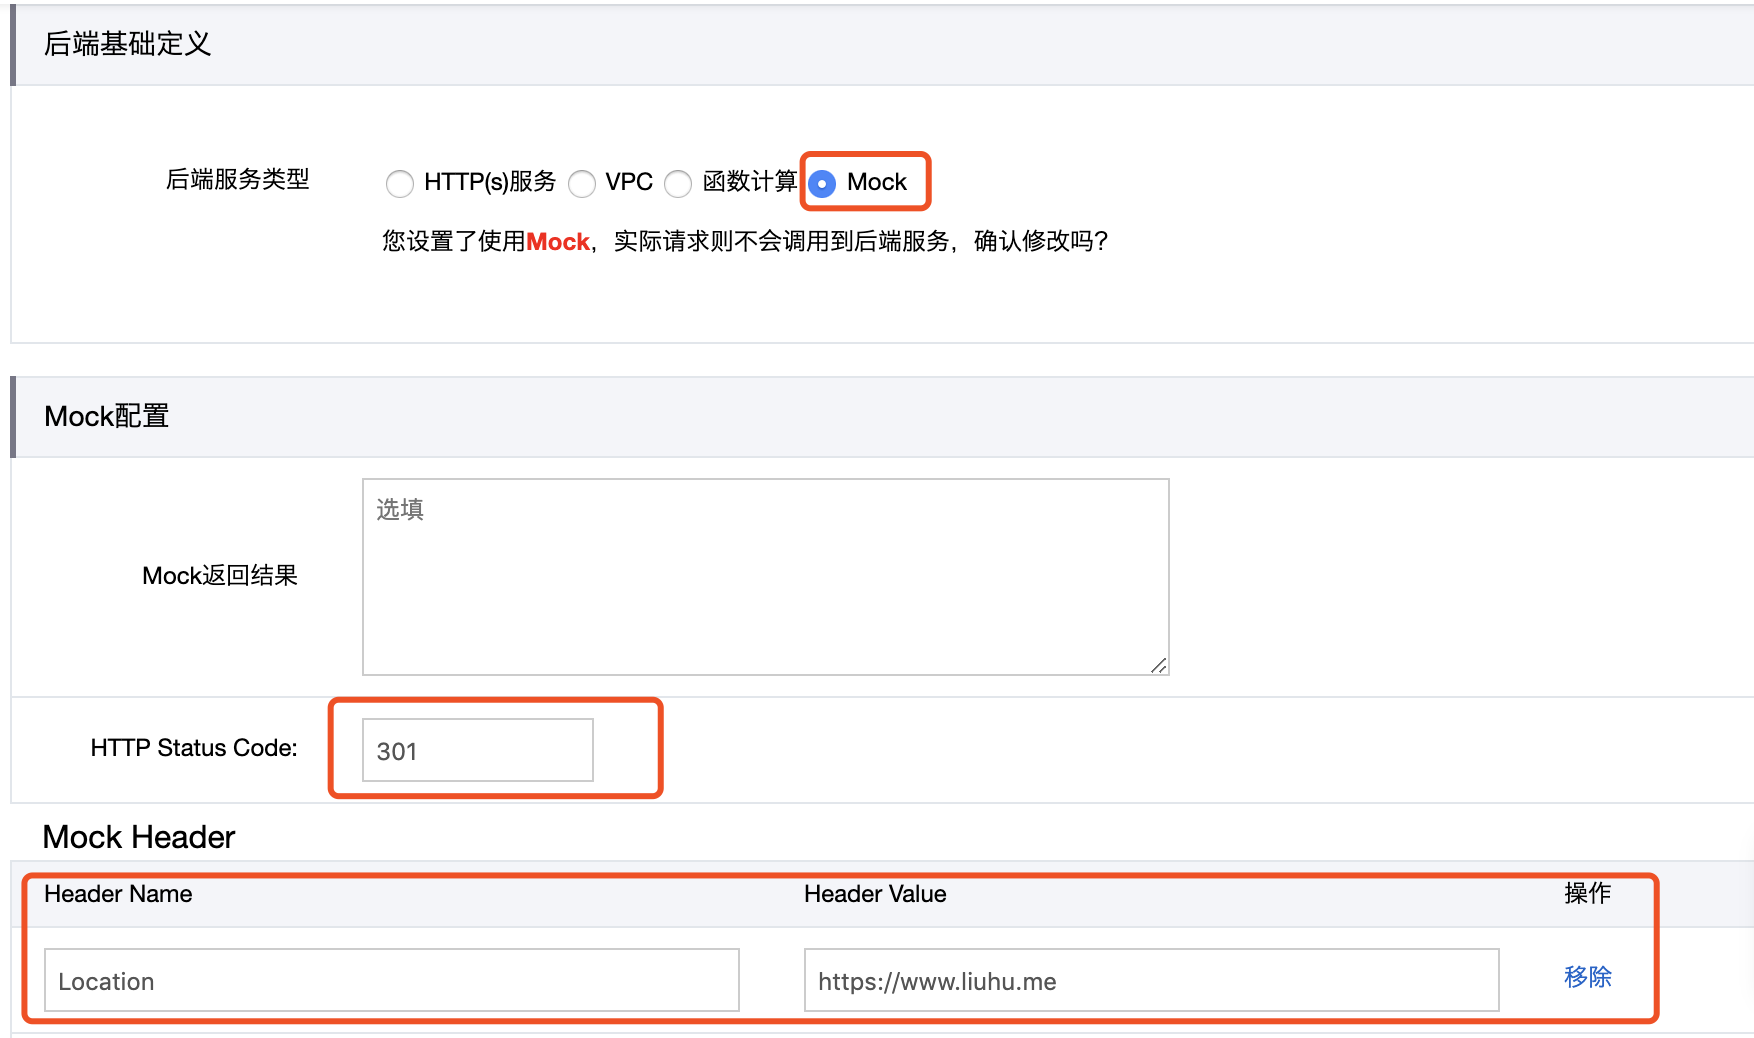
使用网关提供的 Mock 功能,实现根域名 301 跳转。配置如下:
总结

现在博客发访问速度比之前快多了,由于博客的访问量非常少,OSS 的资源占用费也没有产生过,也算是 0 成本吧。

目前看还有两个地方感觉不完美:

  1. 访问 http://www.liuhu.me 不能跳转到 https://www.liuhu.me,目前只实现了根域名的跳转。
  2. 为了解决 OSS 静态资源访问,修改了 Hexo 的插件,可能为后面的插件版本升级带来麻烦。目前看应该影响不大,因为那几个插件都很稳定,好久不更新了。

这个两个问题,目前我有个解决思路,就是使用 API 网关 + 函数式计算实现。 API 网关将请求转发到函数式计算服务中,函数式计算通过分析 Request 请求信息判断,如果不是 https 访问则返回 301 状态码和跳转地址,这样解决了第一个问题。如果是 https 访问,则将请求地址按照规则连接上 index.html 转发到后端 OSS 服务上去,然后将 OSS 服务的返回结果原样返回,这样解决了第二个问题。这个方案后续有空再折腾吧。